
-
Tiling Light
Stardazed supports 3 types of lights: directional, point and spot lights. These are the basic types of lights supported by most, if not all game engines. Up to recently SD had a hard limit of 4 active lights at any time. The light information was stored in a couple of uniform arrays.
I limited the number to 4 initially as all lights were processed for every pixel in the fragment shader, whether they were likely to affect the pixel or not. SD currently only has a forward shader where you process all lights every pixel (or vertex) in a normal render pass. In a deferred shader each light is rendered separately and is usually limited to a section of the screen by enabling the scissor test and clipping rendering to the area of the screen affected by the light.
Another issue is that there’s a limit on the number of uniform vectors available for use during any one draw call and especially on mobile that limit is quite low. The limit is quite easy to reach with a bunch of lights and other uniforms competing for the same space.
Tiled Shading
I had read an article about an implementation of a tiled light rendering pass in WebGL. A student project by Sijie Tian, it is a nice proof of concept of a technique that allows both forward and deferred shading paths to work with a very large number of lights with good performance, provided that the number of lights covering any area of the screen isn’t too large.
In typical scenarios, a level has many lights, but most of them only affect a small area of the map and, depending on the viewing angle, only a couple of lights will affect any given part of the screen, even with many lights in close proximity to each other. Tiled lighting exploits this by dividing the screen up into a grid of square areas and determining before the actual lighting passes are run which lights affect which parts of the grid. Inside the lighting code, a lookup is done in the precalculated grid to get the list of lights that affect the current pixel. So even if many lights are active, the fragment shader will only process the ones that are likely to affect the pixel being processed.
Implementation
Mr. Tian based his implementation off of a paper by Ola Olsson and Ulf Assarsson from 2011 that explores Tiled Shading and details the pros, cons and possible ways to implement it. I decided to use it as a starting point as well. Modifying the lighting code was actually quite easy. Most of the fiddly bits were once again reading the grid and light info from a texture, like in my vertex skinning code. I used the data structure as suggested in Olsson’s paper as shown here (image taken from the paper):
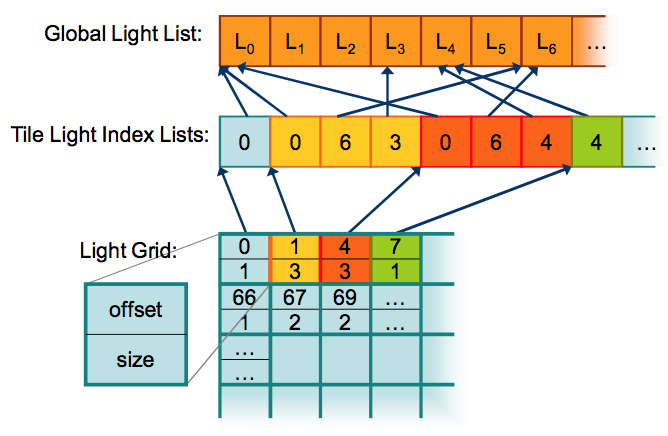
The Global Light List is a mostly static array containing the properties of the lights (position, type, colour, direction, shadowing, etc.) In SD, this list directly represents all of the lights in the scene. The Light Manager component operates directly on the data in this array.
The Tile Light Index Lists is a packed list of variable length lists of indexes into the Global Light List. Each sublist contains the indexes of the lights present in a tile of the Light Grid. This data is updated every frame and will vary significantly as the camera moves through the scene.
Finally, the Light Grid is a grid of cells representing a low resolution view of the viewport. Each cell in the grid represents a 32x32 square on the viewport. The paper by Olsson and Assarsson states that both 16x16 and 32x32 tiles worked out well. Since SD has to generate the grid every frame in JS code, I opted for the 32x32 grid as it reduces the numbers of cells by a factor of 4. The size of the grid is locked to the viewport size % 32 so during normal operation, the size is fixed.
In the Light component, these 3 structures are all stored in a single 640x512 4-component float texture. At startup, a Float32Array is created on the client and is subdivided in 3 layers:
The first 256 rows of the texture are assigned to the global light list. Each light entry takes up 5 vec4s, which was the main reason to have a width of 640 texels, each row can store 128 lights exactly. Given this, SD has a limit of 256 * 128 = 32768 dynamic lights present in a scene, which should be enough for now.
The next 240 rows are assigned to the tile light index lists. Since each list entry is just a single index, I place them together inside the texels, one index in each component. This allows for 640 * 4
- 240 = 614,000 active indexes in any given frame.
Because WebGL 1 does not allow a vec4 to be indexed by a variable, I had to add a set of conditionals in the data lookup code as shown below. This is only done once for each light index access so it hopefully should not add too much of an additional load on the shader. WebGL 1 only allows for simple, mostly constant accesses into arrays and basic flow control.
float getLightIndex(float listIndex) {
    float liRow = (floor(listIndex / 2560.0) + 256.0 + 0.5) / 512.0;
    float rowElementIndex = mod(listIndex, 2560.0);
    float liCol = (floor(rowElementIndex / 4.0) + 0.5) / 640.0;
    float element = floor(mod(rowElementIndex, 4.0));
    vec4 packedIndices = texture2D(lightLUTSampler, vec2(liCol, liRow));
    if (element < 1.0) return packedIndices[0];
    if (element < 2.0) return packedIndices[1];
    if (element < 3.0) return packedIndices[2];
    return packedIndices[3];
}
The light grid is stored in the final 16 rows of the texture. Each cell taking up 2 components so each texel stores 2 cells. So again, I can store 640 * 2 * 16 = 20,480 cells. Each cell represents a 32 x 32 rect on the screen, so even a retina 5K fullscreen viewport (5120 x 2880) only needs 160 * 90 = 14,400 cells. Given that most WebGL apps run (by necessity) in a small viewport (like 720p), this should suffice for a while.
Given a more typical 1280 x 720 viewport with 920 cells, the current max of 614k indexes allows for an average of ~639 lights per cell, way more than reasonable. Of course, right now the texture size is fixed at 640 x 512, but I’m planning to add smaller versions as well for simpler scenes to have as little wasted memory as possible. By having the rows allocated for each structure be variable as well a very efficient lookup table can be created for scenes with a known number of lights.
Since the table is calculated on the CPU and only a small part is changed every frame, the GPU texture data is updated by determining which rows in the 3 tables are affected and only sending those to the GPU.
Building the Light Grid
As noted above, every frame the light grid and tile light index lists have to be updated. Currently, only point lights are projected, spot and directional lights are just added to every cell in the grid. The point light loop conceptually works as follows:
- for each point light
- calculate an (approximate) area on the viewport that the light will affect
- for each (partial) cell in the light grid covered by the area
- add the light’s index to the cell
- flatten the tile indexes into one long array
- store the offsets and counts in the grid
The projection is made by calculating the 8 vertices of the cube enclosing the full range of the light in worldspace. Each point is then projected into screen space and the 2D rectangle that encloses all of the projected points is the result.
I used my older LD34 entry Snowman Builder Extreme to test the code that projects the lights onto the viewport. The game is simple but has a nice sequential series of lights that are easy to mentally map onto the screen as well. The following screenshots show the state as of then:

And another from a debug birds eye view:
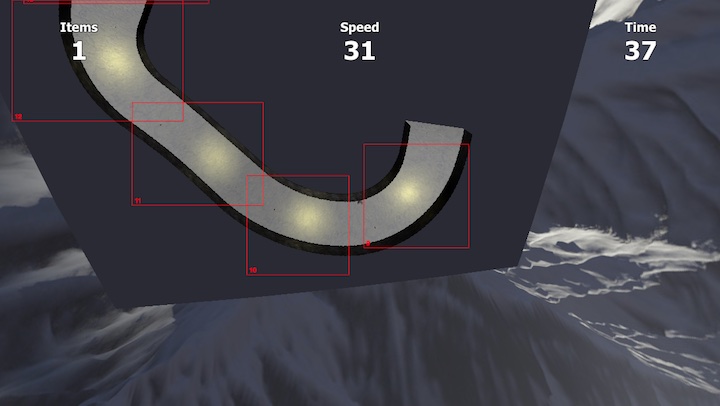
I’m not satisfied yet with the rect calculation and there are some issues to work out, but this was good enough for my current LD entries so I moved on.
Optimizing the Light / Grid Loop
The conceptual light test code above can be rather heavy if done with many arrays, flattening and concatenating them, so I took a different approach. I split the work into 2 blocks, as shown by this pseudocode:
interface LightGridSpan {
    lightIndex: number;
    fromCol: number;
    toCol: number;
}

// ...

function updateLightData() {
    let gridRowSpans = Array<LightGridSpan>[gridHeight];

    // create a list of 1D spans for each row in the grid per light
    for (light of pointLights) {
        let screenRect = projectLightToScreen(light);
        let gridRect = screenRectClampedToGridDim(screenRect);

        for (row = gridRect.top to gridRect.bottom) {
            gridRowSpans[row].push({
                lightIndex: light,
                fromCol: gridRect.left,
                toCol: gridRect.right
            });
        }
    }

    // iterate over each cell in the lightgrid, filling the tile index lists
    // and populating the grid.
    let indexOffset = 0;
    let gridOffset = 0;

    for (row = 0 to gridHeight) {
        let spans = gridRowSpans[row];

        for (col = 0 to gridWidth) {
            // append the light index for each applicable span to
            // the light index list
            for (span of spans) {
                if (span.fromCol <= col <= span.toCol) {
                    tileIndexLists[indexOffset++] = span.lightIndex;
                }
            }

            // write the offset and count of the tile indexes used for
            // this cell to the grid
            lightGrid[gridOffset] = (cell index offset, cell light count);
            gridOffset += 2;
        }
    }
}
Even though the second block has several nested loops, it traverses the grid data linearly once and iterates over the relatively short span list each cell, and the span list is updated only once per row.
Future Work
As it stands, this works quite well but I took some liberties here and there as part of the code was written during a Game Jam. I will want to have spot lights also projected to either a rectangular area or a cone on the screen (the spans array can represent arbitrary shapes, so that was a happy accident.) The actual calculation of the areas also needs to be cleaned up, it now has some fuzz factors applied to make it work.
It worked out quite well for my LD37 entry, Callisto, where I was able to have about 30 point lights in a single room all calculated dynamically without any real trouble on most hardware.
Oh right, light maps. Need those too.
-
GDC 2016
Tired but inspired, I’m quickly writing down my impressions of my first visit to the “main” Game Developers Conference in San Francisco that has just ended.
Previously I had visited the European GDC in Cologne, Germany twice now, but GDC San Francisco is a lot bigger. About 20,000 people attend this one where the European one probably gets maybe 1,000 in total. The expo part is a full on conference and every time slot there are about 20-30 sessions going on in parallel vs about 4 in Europe.
Attitude
The only other large developers conference I’ve attended is WWDC (Apple’s worldwide developers conference) in 2012 and while the both of the conferences’ normal sessions have a similar feel, GDC sets itself apart in the special sessions, roundtables and other events. GDC has 2 back-to-back award events and the tone and atmosphere are casual and informal with both the hosts and and several receivers of the awards throwing out the occasional f-bomb. The event was quite polished though and certainly serious in nature, but it’s presented in an informal and fun way.
Apple’s WWDC also has an awards “show” where recipients stand on the stage for a bit and are then whisked away without getting even a word in. There’s also a sort of free-form event that felt incredibly awkward, with long-time Apple engineers trying to force in a 90s Mac OS vibe in front of developers that are mostly there for iOS and likely have no idea what they’re talking about. Apple is not good at being informal. GDC is a lot better, despite being 4 to 5 times bigger.
People
Networking is arguably the most important part of GDC for many and I had a chance to connect with quite a few people, talking about Stardazed, comparing it to other frameworks and gauging people’s reactions to a TypeScript-based, DOD component based, browser 3D game framework. I got enough good reactions that it at least felt like all my work was not in vain, which is always pleasant.
It was also good to see that since 2012 these conferences have gone from basically all dudes to just predominantly dudes. Especially the younger crowd was a lot more varied than the bunch of dudes in shirts typically seen at conventions like these. Full disclosure: I’m a white dude in a shirt.
And while a good part of the crowd was American, I met, saw and heard people from all over the world. I’d say it was about 40-60 USA-rest of world split. If you attend you have a good chance of meeting up with fellow country members during the week.
Besides meeting people at the conference, GDC has parties going on every evening, but most are for particular groups or those “in the know” but one I went to was open to all at the Github HQ. They have an in-house bar and cafeteria, an ante-room that looks like the oval office, a fixed DJ booth and I would not be surprised to find some places to sleep there as the message is clearly that you don’t have to leave the office ever again. It’s certainly a cool place though and the whole evening was pleasant and relaxed. I also pushed a commit to Github from within Github HQ, which felt appropriate.
Tech
VR is the hip tech this year, with companies big and small demoing experiences using their engine or for their controller gizmos etc. I was and remain a VR skeptic, at least until the VR headsets and other gear improves by a good deal. Big VR kits had large cables connected to PCs that had to be held up in place (do VR kits come with these assistants when I buy them?) or they are smartphone-tech based which are not smooth enough for my brain to handle. I’ll keep an eye on VR as kits will (likely) get more portable and cheaper, as long as the current hype does not create disillusionment before it has time to get to a better place.
A few tech highlights for me were:
- The Ray-casting hardware in the upcoming PowerVR chipset. This obviates a ton of workarounds done for GI with all the cube maps, light maps etc. and the idea seems so obvious that I was wondering why no one else has tried this yet.
- Amazon Lumberyard is cool and it left Crytek no other option than to just make their product basically free and open source as well.
I had hoped to have a bit more interesting stuff to show but the next GDC is already in August in Cologne. GDC was inspiring with all the cool stuff being made and people loving what they do. I’m looking forward to the next one!
-
Hardware Vertex Skinning in WebGL
FBX is a 3D data interchange format supported by practically all 3D modelling programs and as such has become a de facto standard source format for many game engines. For example, Unity and Unreal Engine assets are predominantly FBX files.
Currently, Stardazed can import data from v7.x FBX files in both binary and ASCII encodings and extract skeleton hierarchies, skeletal animations, geometries (meshes only), materials, textures, etc. ready for use in-engine. The final part in development now is the vertex skinning information.
To ensure that SD would not get a biased implementation of vertex skinning and rigged models I took a quick detour to import the MD5 file format used by Doom 3. The format is particularly suited to make a reference implementation against as it is clutter-free, well-organised and easy to understand, things I would not immediately say about the FBX file format.
In addition, while Doom 3 is an older game from 2004, the core principles of rigging and skinning have not really changed since then (as far as I know). A model has a hierarchy of joints (or bones) and each of the meshes’ vertex positions are calculated from 1 or more weighted joint-relative positions.
While Doom 3 calculated the final positions using optimized SIMD code on the CPU, I decided from the beginning that the skinning would take place on the GPU in the vertex shader. Even if the mythical SIMD instructions ever become generally available in browsers, it’s still more efficient to just let the GPU handle it as we’ve got a lot more GPU time than CPU time available per frame.
Implementation
For the vertex shader to be able to calculate the vertex’s final position, it needs a few pieces of information:
- The current transforms of the joints
- The indexes of the joints of each of the weights
- The joint-relative position and bias of each weight
I initially wanted to just pass in the joint data as a uniform array of positions and weights and then just index into that array with each of weight’s joint index but that is not allowed in WebGL 1.
In WebGL we only have vertex attributes, uniforms and samplers to pass data to shader functions. No uniform blocks, texture buffers or stuff like that. In addition, and more importantly, any array may only be indexed by either a constant value or the index variable of a for-loop. Using an arbitrary variable as an index is verboten.
So, change of plans, what is arbitrarily indexable? Textures. I went with the following data layout:
// Per-vertex data in attributes
vec4 vertexJointIndexes;         // Four joint indexes (-1 means end of array)
vec4 vertexWeightedPos0_joint;   // xyz = joint-relative pos, w = weight
vec4 vertexWeightedPos1_joint;   //       "          "          "
vec4 vertexWeightedPos2_joint;   //       "          "          "
vec4 vertexWeightedPos3_joint;   //       "          "          "

// Uniforms
sampler2D jointData;
The
jointDatais a texture with 4-component float element pixels. Each joint is encoded in 8 pixels, the last 4 forming amat4describing the full transform of the joint in model-space. In the vertex shader, the weight positions are then transformed by the corresponding joint and scaled by their bias and added together for the final position.The main downside of this data layout is that each vertex can have no more than 4 weights. Some of the MD5 models use 5 for some vertexes but ever since vertex skinning moved to hardware I’ve understood that a limit of 4 has become quite common. Additionally, if a vertex uses less than 4 weights, the unused attribute vectors still need to be in the vertex buffer. Simple models will thus have quite a bit of dead weight, but looking at more modern models I’ve seen 3 or 4 bones per vertex being the average so I feel this is a reasonable compromise, especially for a first implementation.
Another minor point is that float textures are not part of standard WebGL, but an extension. It is a very common extension though, mostly being unavailable on lower-end mobile phones. I am completely fine with that as those lower-end devices are not very suitable for browser-based 3D games anyway.
But enough of that. Here’s Bob, a free MD5 model I used for testing:

The image alternates between a visualisation of the joint nodes and the skinned mesh. Joints in Stardazed are just represented by normal hierarchical entities and can be mixed with non-skeletal entities such as the light that I added manually as a child of the lamp’s joint node.
What’s left now is just cleaning up and ordering the prototype code and wrangling the FBX data to work in this model as well. Piece of cake…
-
It Lives
Through this venue we shall inform the populace about the imminent global phenomenon that is Stardazed, an in-development web 3D game library written in TypeScript.
Well…, I like it at least.
If you’re into code, have a look at the code on github.
If playing games is more your thing then play my Ludum Dare entry I made using SD:
Snowman Builder Extreme. It’s a game jam game made in 3 days but it’s still pretty decent, also try it on your phone!More info coming up, stay determined.
(updated Jan 2018, changed the URLs and project name from SDTX to SD)
subscribe via RSS